

2010-2018 6.7 Cummins Thermostat Replacement & Coolant Flush
A step-by-step companion for the linked YouTube video.

The accompanying YouTube video can be found here.
In this video, I use a Traxion Top-Side Creeper to access the engine bay much easier. It is not a required tool for this job, but it does make a huge difference. https://amzn.to/3zor1nk (Paid Link)
Required tools-
1/4 Drive Ratchet- https://amzn.to/3OLLqZp (Paid Link)
1/4 Drive 8mm Deep Socket- https://amzn.to/3OKWgyL (Paid Link)
1/4 Drive Extension- https://amzn.to/3PZZeAI (Paid Link)
14mm Socket for Banjo Fitting to Burp Coolant- https://amzn.to/3cHoXiH (Paid Link)
Coolant Funnel- https://amzn.to/3JhzJs6 (Paid Link)
Channel Lock Pliers- https://amzn.to/3bj3xIs (Paid Link)
Required parts-
Cummins Thermostat- https://www.genosgarage.com/product/r...
NOTE- Ensure you're buying a genuine Cummins thermostat. There are a ton of issues with aftermarket thermostats on this engine. The genuine Cummins thermostats come with the thermostat seal, if you go aftermarket make sure your order the seal as well.
MOPAR Coolant- https://amzn.to/3zKH6Fu (Paid Link)
As an Amazon Associate I earn from qualifying purchases.
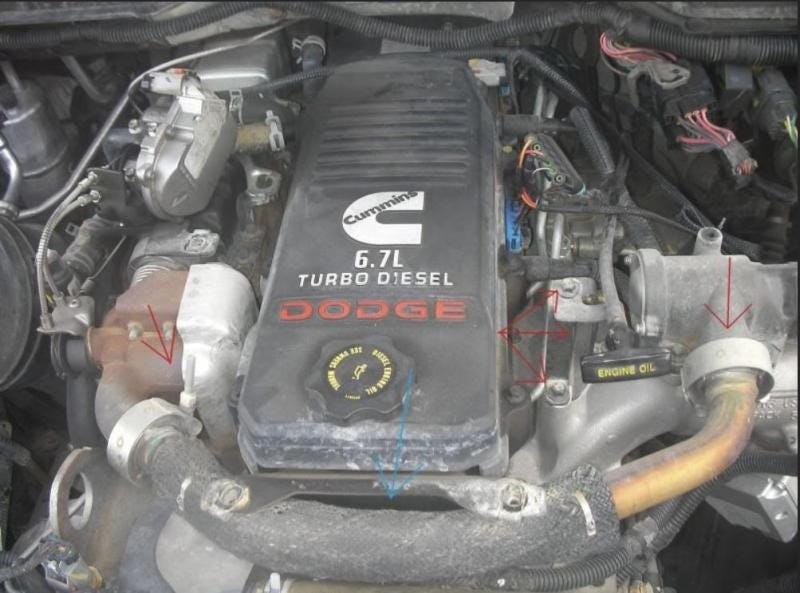
Please note, my truck is deleted. All EGR components have been removed. Below is a picture of a non-deleted truck with critical items circled that’ll need to be removed before starting with the steps shown in the attached video.
Once you’ve removed your crossover pipe, if applicable, you’re ready to start your coolant drain.
Start by removing the fender liner on the passengers side of the vehicle to access the lower radiator hose.
Disconnect the lower radiator hose from the radiator. Have your 5 gallon bucket ready, it will be messy. You’ll drain off approximately 5 gallon’s of fluid, so I recommend having an extra bucket on standby.
It’s important to note, this is a 6 gallon system. If you want to drain the entire system you’ll have to refill the radiator with water or coolant and conduct 2-3 flushes doing the steps listed here. This truck recently had a coolant flush when the EGR components were removed, so I did not do a complete purge of all old coolant.
Next we’re going to move to the topside of the vehicle and remove the thermostat housing. There’s a heat shield above the housing held in place with 2 8mm bolts. The housing itself is also held in place with 8mm bolts.
Next you’re ready to remove the thermostat itself. It’s important to make sure the gasket is intact with the thermostat. If the gasket isn’t around the thermostat, make sure you remove it from the housing before proceeding.
Make sure you replace the thermostat with a OEM Cummins thermostat. The Gates thermostats have a really high failure rate in these engines.
When installing the new thermostat, make sure it is completely seated and level. If you end up placing it in crooked, you risk pinching the o-ring and compromising the seal.
You’re ready to reverse order with the thermostat housing, heat shield and lower radiator hose.
I replaced the coolant with 1 gallon of concentrate and then 1 gallon of distilled water. MAKE SURE YOU USE DISTILLED WATER. You should be able to fit roughly 5 gallons of fluid before running air pockets out of the system.
Crack the banjo fitting on the coolant overflow tube to allow air pockets to escape the system.
Crank the vehicle and allow to come to full operating temperature. You should hear the thermostat open at 185 degrees if you installed the thermostat linked above. Allow the truck to run with the overflow open for roughly 30 minutes. You’ll start to see a steady flow of coolant come out of the overflow. Bubbling indicates there’s still air in the system.
Once you’ve purged the system of air, make sure you recheck the reservoir. I recommend carrying premixed coolant with you for roughly 100 miles following a coolant flush, you will see the level drop a couple of times and will need to top back off.
Once you’ve refilled the coolant, take one last look to ensure you don’t have any leaks and replace the fender well cover.
I hope this article helped further break down the process of a coolant flush. Please remember to like and subscribe on YouTube, and feel free to subscribe to our SubStack. Once subscribed, you’ll get emailed all of my step-by-step guides published to accompany my YouTube videos.